Good day. Through two sections from mine lives Polina Petrovna - a rather strange woman.
She constantly buys expensive pest control products, which for some reason are ineffective. Recently I bought about 20 mousetraps - I wanted to catch mice.
Out of kindness, she decided to save her money and told how to make a mousetrap with her own hands, which is easy to manufacture and much more profitable than the purchased option. Now I will share with you the main tricks of production.
The content of the article:
How to quickly make a mousetrap
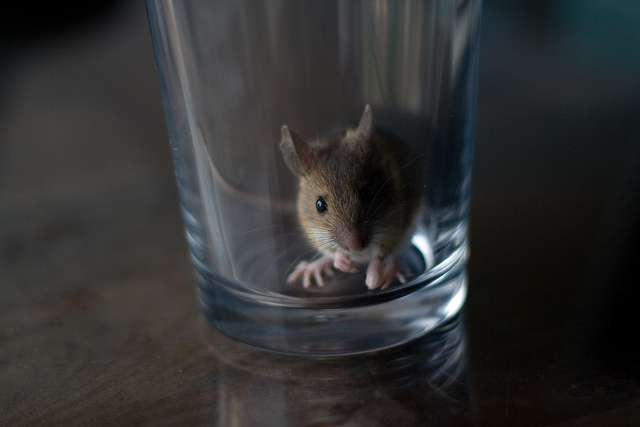
A mouse is a mammal that can climb not only on horizontal surfaces, but also on vertical and even glass, so almost every family will sooner or later face the problem of buying or creating a mouse trap to catch a mouse.
For example, I live on the fifth floor, and despite this, I recently saw in my apartment a tiny gray mouse running along the battery pipe. I don’t have a cat, so I immediately turned on the computer and began searching the Internet how to quickly make a mousetrap from the materials I had. Frankly, I have found enough options.
View 1
First, I made a mousetrap from a bucket and a lid, the circumference of which is smaller than the inner diameter of the bucket. It should work like this: when the mouse follows the bait, it stands on the lid of the bucket, which turns over and the rodent falls inside. The author of this design recommended pouring 3-5cm into a bucket. water to prevent the mouse from jumping out.
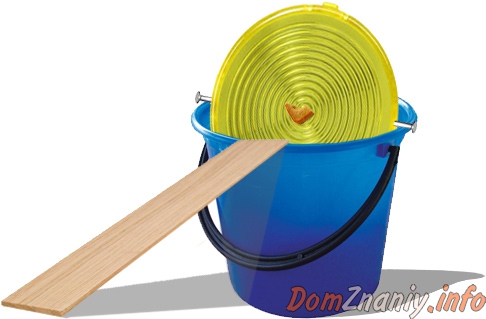
For several days, I was not able to catch the animal with the help of this mousetrap, since I need "jewelry accuracy" when mounting studs to the lid. If there is even the slightest advantage, then the lid rotates by itself. Yes, and the mouse itself, probably too lazy to climb on top of the cover. In general, I abandoned this design.
View 2
The next mousetrap I made consisted of a plastic bottle. To create it, you need a square bottle, but since I didn’t have one, I decided to try to make a few of the usual cylindrical ones.
I will not begin to tell and show the design itself, since I could not catch anything on such a mousetrap. The whole problem, most likely, was due to the cylindrical bottle, so it did not work.
View 3
The simplest mousetrap do it yourself.
The last construction of the mousetrap, which I made, already in the evening pleased me with the caught mouse, so I decided to tell everyone how to make it.
What does it consist of?
To create a mousetrap you will need:
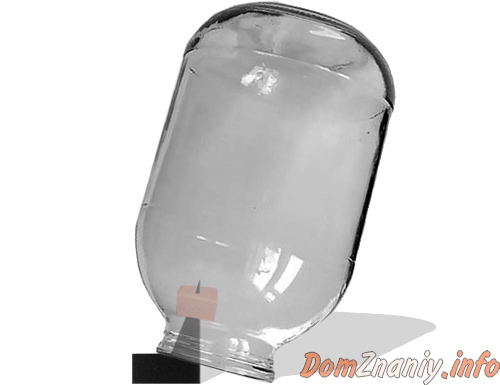
- A can of two or three liters;
- Hard cardboard or flat plastic;
- A piece of sausage, for example, a doctor’s.
To begin with, from a cardboard or flat plastic, you need to cut such a figure:
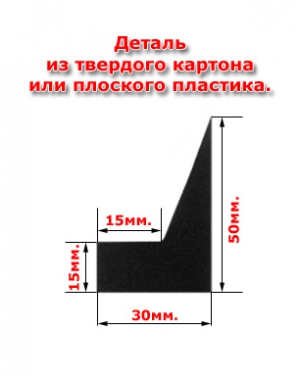
Put the bait on the sharp part of the cut figure. You can read about different types of lures on the Internet, but I know for sure that mice love sausages. I caught the “gray” on a piece of the doctoral.

The bait is ready. Now put the jar on top of the cut figure with the bait, and then set the mousetrap where the mouse was seen. When the rodent crawls into the gap between the can and the floor and pulls the bait (in my case, the sausage), the figure will fall and the mouse will be inside the can.
This mousetrap is good because it’s not difficult to make it out of handy things, and the design itself is made so that the mouse remains alive (humane mousetrap), and you can let it go away from home.
We catch rodents in simple ways
A mouse trap will help get rid of unpleasant and sometimes dangerous rodents - it’s easy to make a device with your own hands that is not inferior in effectiveness to the models available on the market.
The independent manufacture of mousetraps from improvised materials will save money, because most often, several devices are required to eliminate pests. Based on the above descriptions, you can choose the most effective and simple designs in execution.
Benefits of Homemade Mousetraps
If the use of toxic substances to control rodents is undesirable due to the presence of children or pets in the house or at the dacha, and buying several traps in the store seems too costly, it's time to learn how to make a mousetrap yourself.
Most self-made traps are reusable or self-loading, which allows you not to monitor them constantly and catch several rodents with one device, leaving the trap unattended for the time of departure (optimally - no more than a week, so that an unpleasant odor does not appear.
In order for a pest hunt to be successful, it is not enough to know how to make a trap for mice.
It is also important to “convince” rodents to show interest in this trap, which means it will require an attractive bait. There is a common stereotype - mice are very fond of cheese.
Animals really like this product, but as a bait, sunflower seeds, slightly toasted sunflower oil or a piece of bread soaked in it will be more effective.
A win-win option will be sesame oil - its aroma does not leave mice indifferent, and you can also use a piece of bacon.
Bucket and Ruler Trap
Such a trap model is suitable for those who prefer the simplest but most effective solutions and prefer clear instructions, including how to make a mousetrap with their own hands.
Another advantage of such a trap is the interchangeability of its elements - instead of a bucket, you can take an old pan or plastic container, and the ruler can be replaced with any suitable sized rail or strip of thick cardboard.
It is on the overhanging end that the bait is placed. The trap is located in a place where the mouse can climb onto the rail laid on top of the bucket. A mousetrap will work if the container is empty, but it is recommended to fill the bucket with water by about a third to increase efficiency.
Such a trap just works. The mouse goes along the ruler, attracted by the smell, but, having overcome the intersection of the ruler and the spoke, it shifts the center of gravity of the structure, as a result of which the end of the ruler freely hanging over the bucket drops sharply and dumps the rodent into the container.
In order for the mousetrap to be able to operate repeatedly, the bait should be fixed on the rail so that when it is activated it does not fall into the bucket with the mouse.
Jar trap with cut paper on the neck
Such a trap for mice with their own hands is done by analogy with the previous one. So that the mice can rise to the top of the can, a “ramp” is installed, but the bait in this case is placed inside the can, the neck of which is pulled by paper.
As soon as the animal falls onto the paper, the “petals” formed during the incision bend inward, the mouse falls into the jar. In other embodiments, it is possible to lay a lightweight bait directly in the center of the cut paper, or the bait is tied to a rope and is located above the center of the can.
The disadvantage of such a simple trap is not very high efficiency. Mice somehow feel the catch and fear cut paper.
Glass jar mousetrap and coins
Such a home-made mousetrap from a can is simple and can also be made from a saucepan, and a coin can be replaced with a large button or a metal washer if desired. The coin (button, washer) supports the raised edge of the can. A strong thread with a hook at the end is glued or tied to the support.
For maximum efficiency, the bait should be placed at a distance of 2-4 cm from the surface. The drawback of the trap is that it requires reloading. That is, having “covered” one mouse, the jar ceases to be effective.
In a simpler version, the bait can be glued to the wall of the can, then when you try to reach it, the mouse will swing the can, which will lead to the fall of the support.
In order to remove the caught rodent, it is convenient to slip a sheet of cardboard under the triggered jar.
Plastic bottle traps
1 option. Such a mousetrap with your own hands from a plastic bottle is done in a few minutes. The container is cut at the level of 2/3 of the height (the longer part is with the bottom). After that, the part with the neck is turned over (the neck without a cork becomes directed inside the structure).
The neck is lubricated with oil, and a bait is placed inside the tank. So that the parts do not separate, they can be fastened with glue, wire or in another way. The mouse easily slips through the greased neck, but cannot crawl out.
Option 2. Another simple mousetrap, even a schoolboy will figure out how to do it.
A plastic bottle (the neck is cut off at about the beginning of the narrowing) with the bait inside is placed on a table or shelf so that a significant part of the container hangs from the edge of the surface. In this case, the bait should be located at the very bottom.
Such a trap is tied to a shelf with twine, the length of which ensures that the trap hangs over the floor when it falls. The mouse, falling into the bottle, shifts the center of gravity. The trap falls and hangs with the rodent caught.
Bucket and spinning bottle device
One of the most witty decisions on the topic "how to make a mousetrap at home", while effective and easy to execute. It will require a metal rod-axis and a plastic bottle with a cap.
In the container (in the lid and bottom), holes are made along the diameter of the axis, after which the bottle is put on the rod so that it remains able to rotate freely.
The rod is placed on the edges of the bucket. Optimum fix its position, while maintaining mobility. A bucket (you can use a basin) is recommended to fill with water. As a decoy, a bottle in the center is coated with any composition (attractive in smell to mice) (processed cheese, sunflower or peanut butter, etc.).
After that, build a "ramp" from the floor to the edge of the bucket. Having freely reached the edge of the bucket along such a "bridge", the mouse tries to move to the bottle, but the latter, under the weight of the rodent, rotates around its axis and dumps the pest into the container.
Glue traps
Choosing how to make a mousetrap with your own hands, you should not lose sight of the simple-to-use glue traps.
Getting to the aromatic "treat", the rodent sticks to a viscous composition. The disadvantage of this trap, many consider unaesthetic. It is already impossible to detach the animal from the mousetrap, and the sight of the floundering rodents and their squeak is not a pleasure if the owners are at home.
Homemade Mousetraps
Mousetrap made from box and burdock. This homemade mousetrap has a somewhat unusual operating principle. The main component of the mousetrap is the burdock (also known as burdock), namely the spiny inflorescences (cones) of this plant.
If a mouse or rat somehow touches these spines with its skin, then getting rid of them will be very difficult or even impossible. The speed of movement of a mouse surrounded by a burdock will decrease significantly; moreover, a burdock attached to a mouse will cling to various obstacles.
To make this mousetrap, you need some kind of box in which to make a hole sufficient for the mouse to pass freely. The box should be filled with a burdock, but so that the mouse could move relatively freely inside, while clinging to the burdock, and lay out the bait - peanut butter, nuts, slices of pizza, cheese, etc.
In order to beat off the smell of a person, the mousetrap should be sprayed with some odorous oil, for example, sunflower oil, preferably unrefined, or the box can be wiped with alcohol.
Gravity
To make this home-made mousetrap, you will need a plastic bottle and a rope. The neck of the bottle should be cut off as shown in the figure so that the mouse could get inside the trap, and also make two holes near the cut-off point, to which one end of the rope should be tied.
The other end should be tied to some heavy object located on the table. Some kind of bait is placed in the bottle, such as peanut butter or cheese, and the bottle is placed on the edge of the table so that the part of the bottle where the bait is located hangs a little.
Now the mouse, smelling the bait, will climb onto the table and climb into the bottle. Approaching the bait, the balance of the bottle will be disturbed, and the whole structure will fall off the table.The length of the rope is chosen so that the bottom of the bottle is a little short of the floor, this will not allow the mouse to get out.
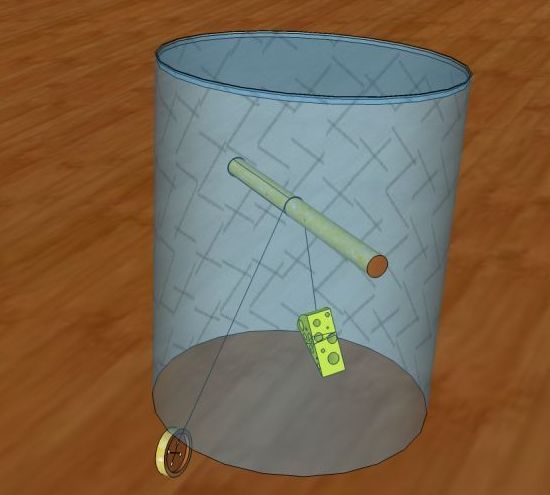
Out of the bucket
This mousetrap uses a rotating drum made of 0.33 aluminum or tin can. A steel rod is inserted through the can, which is inserted into the bucket (see figure).
If the mouse decides to feast on the bait and rises up the ramp, then it will have to jump onto the jar, since the distance between the edge of the bucket and the jar is not small enough for the mouse to step over it, so this distance is a key factor in the entire design of the trap.
Since the can is free to rotate on the axis, the mouse, being on the can, will lose its balance and fall into the water. This mousetrap is of an inhuman type, although if you use a deep bucket without water, the mice will not die and they can be released somewhere further away from the house.
This mousetrap can also be used on a garden plot, in this case a ramp is not needed, and the bucket should be dug at the same level with the surface of the earth.
From a plastic bottle
Cut 3/4 of a two-liter plastic bottle, counting from the bottom, turn the neck over and insert it into the rest of the bottle, as shown. Make 3-4 holes in the bottle and neck, thread a wire or paper clip into them and firmly fix it.
Now put a bait at the bottom of the bottle, such as peanut butter or sunflower seeds. Lubricate the neck of the bottle with sunflower or olive oil to prevent the mouse from catching.
Place a mousetrap near a kitchen shelf or next to some object that the mouse could climb to the neck of. Once trapped, the slippery and narrow neck of the bottle will prevent the mouse from escaping. Having caught the mouse, take it somewhere far away and release it.
Very simple mousetrap
And in conclusion - the simplest mousetrap, consisting of any inverted container of sufficient depth and suitable weight, for example, a metal bowl, and two rods fastened with cheese. As can be seen from the figure, two metal or wooden rods form a support, fastened with a sleeve made of a hard piece of cheese.
A hole in the cheese can be made with a hot nail, along the way this will increase the smell of cheese. When the mouse begins to gnaw on the cheese, the integrity of the props will be broken, and the bowl will fall.
That the mouse could not get out, the bowl should be massive enough, or you can put some load on top of the bowl.
The lower figure shows an even simpler design of the mousetrap, in which the support is directly a piece of cheese of hard varieties, gnawing such a support the mouse is trapped. To transport the mouse under a bowl, palm off a thin, hard sheet of plastic or sheet metal, take it all away, and release the mouse.
Do-it-yourself mousetrap
You won’t believe it, but the standard spring mousetrap was invented by Hiram Maxim, creator of the legendary Maxim machine gun, behind which Anka the machine gunner, along with Vasily Ivanovich Chapaev, valiantly repelled the White Guard attacks, and who faithfully served two world wars in the troops of different countries.
A well-deserved machine gun is now standing in the museums of armaments, and the spring mouse trap continues its life journey. Paradoxes of history.
They tolerate various diseases, harm the crop harvested by man, women fear them more than invented monsters.In general, they must be fought and humanity is waging this unsuccessful struggle.
Over the millennia, many variants of the mousetrap were invented, but the spring mousetrap is most popular.

It is simple in design and use. Explain how it works, only make people laugh. But a few words about the bait. It is believed that mice are very fond of cheese, and willingly go to the mousetraps, where it is located as a bait.
But, no less, attractive baits are meat, bread, chocolate, nuts, peanut and butter. Everything is learned in practice. What’s better for catching mice, use that bait.
Not always such mousetraps work effectively with mice. It comes to the fact that the rodent eats everything, but the mousetrap does not work. If you find it difficult to set up a mousetrap, find a position when it starts to work from the slightest touch, then you can do everything as follows. Slightly bend the rod holding the claw frame.
Next, attach kapron threads to the hook of the rod with a thread in which to tie the bait. The thread is finally tied to a bracket on the base.
When the mouse pulls out the bait and cuts the thread, the thread will break accordingly. The rod will rise and the frame will slam. As a result, the mouse itself will gnaw through the “last thread” that keeps it from lethal outcome.
"House" (purchase option)
Simple and affordable mousetrap. The principle of its operation is clear from the figure - instructions. The bait is fixed on the back cover, and is firmly attached to the body.
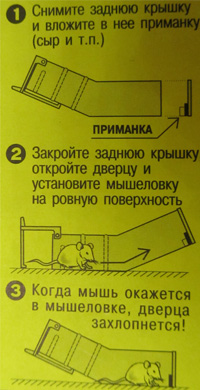
The front door is locked in the open position. The mouse, getting inside, and moving towards the bait slams the front door. The enemy is caught.
"Cell". It consists of a piece of plywood or wood with a steel cage. The spring slamming the front door is fixed with a pin with a hook on which the bait is mounted. When you try to remove the bait, the spring is released and slams the door.
Well, about the most high-tech, computerized mousetrap in the world, which uses several rodent detection systems. And what do you want, we live in the 21st century.
Invented it, so to speak, because it uses the traditional spring principle, Jake Easton. The mousetrap is called Better Mousetrap. Translated, something, like, "The best mousetrap."
Instead of a spring, pneumatics are used. The microprocessor, having received signals from the sensors about the mouse in the reach area, cockes the pneumatic cylinder, which unleashes a moving lever with a force of 50 kg onto the unsuspecting mouse.
If something remains from the mouse, then this is good. Alas, the possession of computer technology has not made a person more humane.
The story of mousetraps - industrial or home-made - can be endless. The principles of catching mice do not change, and the effectiveness also. Now I would like to talk about a nice alternative to making a simple, but effective do-it-yourself mousetrap.
From a plastic bottle
In principle, from the figure below everything is already clear how the mousetrap works. We take a bottle or something similar to it (a pipe with a bottom). We cut a small hole in the upper part.
At the bottom we put the bait. We place the bottle on the edge of a surface so that part of the bottle with the bait is cantilevered. We tie a rope to the other side.
When the mouse enters your makeshift mouse trap, it will run to the bait.As a result, the entire weight of the structure will shift to one side, the bottle will slide down and hang on the rope.
You just have to come and get the unfortunate rodent out of it. As already mentioned, for such a home-made trap, it’s ideal to use a plastic pipe, for example, for sewage, since the height of the bottle may not be enough to create a reliable barrier, the fact is that the mice jump quite well and high and simply can escape from your home-made trap.
With a button and a saucepan (bucket)
Another version of the mousetrap suggested to us by our reader, which you can easily implement from handy materials. The essence of the capture of a rodent is as follows. Inside, at the bottom of a container, say a jar or saucepan, a bait is attached. By the way, mice are very fond of bread soaked in sunflower oil. You can take it as a basis.
That is, the probability of triggering our mousetrap is minimal. But when the time comes to eat, then without minor impacts on the bait from the mouse will not do. And this means that our system will still go out of balance and the capacity will shut.
As a result, the mouse will remain sitting under the can, where you will find it, well-fed, unharmed, but not the fact that you are satisfied. What further to do with the mouse decide for yourself, it is on your conscience. At least the mousetrap is fully functional. Making it with your own hands will not be difficult for you, and at the same time, the mousetrap will not require any significant costs from you. All this is important!
Here is another, almost the same option with a button ...
As we said, such mousetraps are quite wealthy.
With bucket and spinning plastic bottle
Another type of mousetrap, when a plastic or aluminum can is mounted on a rod. At the same time ensuring its free rotation around the axis. Since our bottle or can is a body of rotation, it is very difficult to stay on it during this very rotation.

As a result, when the mouse or rat climbs onto a bottle or jar, it simply slides into a bucket. It is advisable to pour water there so that the rodents do not have the opportunity to push off and jump out of the bucket - a mousetrap.
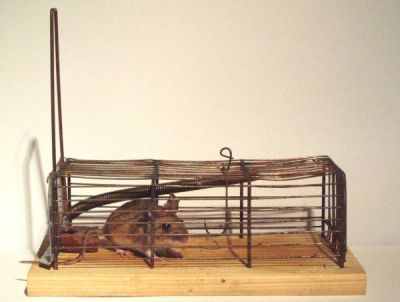
Hive
The hive mousetrap is so named because it is very similar to a hive. The principle of its work is also simple. We bend the springs from a rigid wire, and at its end we hang a steel wire - a ring.
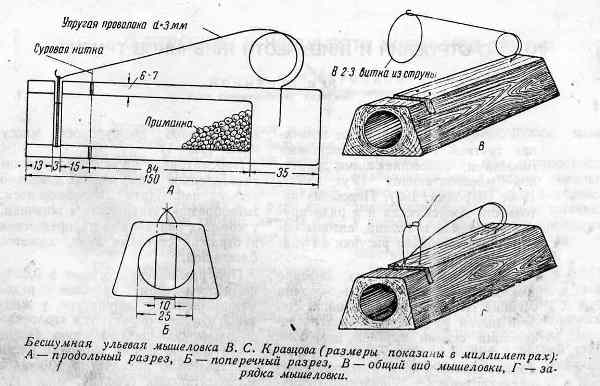
The spring is compressed and secured with a thread. When the mouse climbs into the mink - the hive behind the bait, it will not reach it until it cuts the thread. If she gnaws it, then the spring will open and the rodent will be cut.
Such hive mousetraps can be made both in a single case and in a whole battery. Immediately on a few mice.
With a springboard and bucket
Variations with the so-called springboard can be a great many. Let's say for this you can make such a simple device, or just take and make a tunnel out of paper ...
You can even use a simple school ruler mounted above the bucket. In this case, the principle of operation of such a mousetrap is one. When the mouse enters the springboard, it will surely cross the point along the way to the bait, when the whole system loses balance and the mouse falls down into the bucket. Do not forget to pour water into the bucket so that the rodent does not jump out.
Electric
Here, as it were, everything is simple and not humane. One contact goes to the metal platform on which the mouse walks barefoot, since it does not have shoes.The second contact is raised above the platform and plastered with delicious peanut butter. It is impossible to stay here, as well as to survive after an electric shock.

At the second end of the wire, you can simply install the plug and connect 220 volts to the network.
This means that we do not need to have such a high insight, dodgy, great patience to catch a mouse. It is enough to buy or make one of the mousetraps that we quoted above. You can certainly catch a mouse, there can be no doubt! Just put a little effort into it.
DIY traps for do-it-yourself mice
If rodents are started in your house, it is not at all necessary to immediately start poisoning them - a do-it-yourself mousetrap will become a good, safe and not expensive solution.
Have you got mice in the house? Do-it-yourself mousetraps are a reliable way to get rid of them. You can, of course, resort to the help of classic mousetraps, which are sold in hardware stores, but this solution has one serious minus.
In addition, after catching a rodent, such mousetraps need to be "recharged" every time, that is, leaving them in the country house for a whole week, hoping that with their help all the mice will be caught, will fail.
This article will suggest options for mousetraps that you can do with your own hands from improvised means, and some of them do not need to be "recharged" - they will always be on alert.
Type one - reusable mouse trap that does not require recharging
There are a great many variants of mousetraps that use the force of gravity to recharge, but we will consider the most popular and effective ones.
In the first case, you will need a bucket or a deep basin, a plastic bottle (usually 0.5 or 1 liter bottles are best suited), scissors, an awl, cream cheese and a thin metal (or wooden) rod that will serve as an axis.
The length of the rod should be the same as the upper diameter of the basin or bucket, and the length of the bottle should be less. In addition, we need a flat hold, along which the mouse will climb into our mousetrap.
From a plastic bottle
So, we take a bottle (it should be with a cap) and, with the help of an awl and scissors, we make two holes in it opposite each other. The first should be clearly in the middle of the bottom of the bottle, the second - in the middle of the cap. The diameter of the hole should approximately correspond to the diameter of the rod that you took as the axis.
We pass our axis through the bottle and put it on top of the basin. If you don’t feel sorry for your bucket or basin, and also in order to make the trap more efficient and reliable, you can try to make two small pins (opposite each other) in the upper part of it, in which you put the edges of the axis - this way the construction will become much stronger.
The bottle must be shifted on the axis so that its neck is as close as possible to the edge of the basin, and place a handle in this place so that the place where it rests on the basin is near the bottle cap.
The angle of the board in relation to the floor should not exceed 45 degrees, otherwise the mouse will be very difficult to climb on it, and it will go looking for a treat in another place - for example, in your nightstands. The place where the label is located on the bottle is coated with cream cheese in a circle, and about a third of the basin is filled with water.
That's it, the design is over. The rodent, having climbed up to the mark, will begin to climb onto the bottle, hoping to get to the bait, but it wasn’t there - under its weight the bottle will spin along its axis, dropping the parasite directly into the water.
If everything is done correctly, leaving this design for three or four days, you can be pretty surprised at the number of animals swimming in the basin.
From wood
The second version of the mousetrap resembles the first one to many, with the exception of some details. For its device, we need all the same basin, as well as dostochka. In addition, a second board (platform) will be needed, but of a shorter length (15 centimeters), a hinge, a bait and a weight.
To better understand how to assemble such a mousetrap, it is better to immediately explain the principle of its action. The platform lies at the end of a long board, but not by its entire plane, but only by half.
On the lighter end of the short board, a bait is laid. The board is mounted on the edge of the bucket. The mouse crawls over it, tries to get the bait, but, under its weight, the short flap turns, throwing the animal into the water, after which the platform turns back, waiting for a new parasite.
From the can
The third kind of trap is the simplest. You take a three-liter jar, a piece of thick paper, rubber or thin wire, as well as a bait on a string. The neck of a three-liter jar is wrapped with paper, which, along the edge, is fixed with an elastic band or wire.
On the stretched part of the paper, crosswise we make cuts through the entire diameter of the neck of the jar. Make sure that the paper does not wrinkle heavily, creating the feeling of a whole. We put this design, for example, under a chair, to which we hang the bait on a string.
The bait itself should hang clearly above the cut paper, centimeters in two from its surface. We attach a bank (ramp) to the bank, along which the mouse will climb on it. As you already understood, cut paper does not support the weight of the mouse on it, throwing it to the bottom of the can.
It should be noted that such a do-it-yourself mousetrap is the most ineffective of the three described. Rodents do not always want to stand on cut paper, apparently, feeling in it some kind of catch. In addition to a three-liter bottle, you can use any other container, the main thing is that a sheet of paper completely covers it.
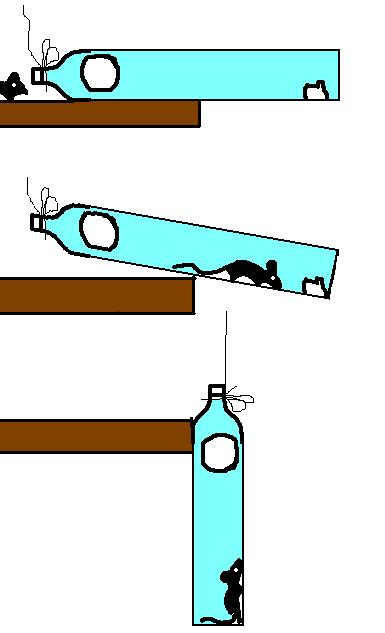
Type Two - Disposable
If you are sure that there is only one rodent that terrorizes you and your loved ones, you can construct a one-time trap, which, after being triggered, needs to be reinstalled. Typically, traps of this type are simpler, and therefore less time will be required to assemble them.
All we need is a plastic bottle with a volume of at least one and a half liters, as well as scissors, a strong thread (it is better to use kapron) and, of course, bait. Using scissors, cut off the top of the bottle. An incision is best done in the place where the shape of the bottle begins to narrow towards the neck.
At the bottom of the bottle, drop the bait and put it on the table so that the closed bottom where the bait lies hangs from the edge of the table. The second end of the twine must be tied to something, and its length is calculated so that when the bottle falls off the table, it remains hanging on the twine, not reaching the floor.
Everything, the trap is ready.The mouse will climb into the bottle, try to take the bait, but the bottle will tip over, catching the animal. You can also advise laying the bottle on a thin piece of fabric - this will reduce slipping, and it will be easier for the mouse to get inside the trap.
Here is another version of the mousetrap that uses the same plastic bottle (interestingly, the creators of such bottles guessed that their invention would serve as the main part of the design for almost all home-made mousetraps?).
We taper the narrowing part of the neck with oil, and in the neck itself, at the bottom of the bottle, we throw a piece of bait. A trap is set next to a shelf or chair from which the mouse would have access to it. As you can see, the design of such a mousetrap is also quite simple, and it can be done in literally 10 minutes.
In conclusion, let's talk about the simplest type of mousetraps with your own hands, the device of which you probably saw in various cartoons. It consists of a container having a depth of the order of 10 - 15 centimeters, as well as a support on which a piece of cheese is fixed.
As a backup, you can use any metal or wooden rod - here it is absolutely not important. You can simply stick the cheese onto the props, or you can pass the rod through it.
Now you are prepared, the mousetrap has been assembled with your own hands, and you are ready to engage in a battle with roaming rodents. Here are some more tips on catching mice:
- As bait, in addition to cheese, you can use makuha, peanut butter, a cube of bread soaked in unrefined sunflower oil.
- To avoid unpleasant odors, do not leave the mousetrap (especially reusable) unattended for more than a week.
leave a comment