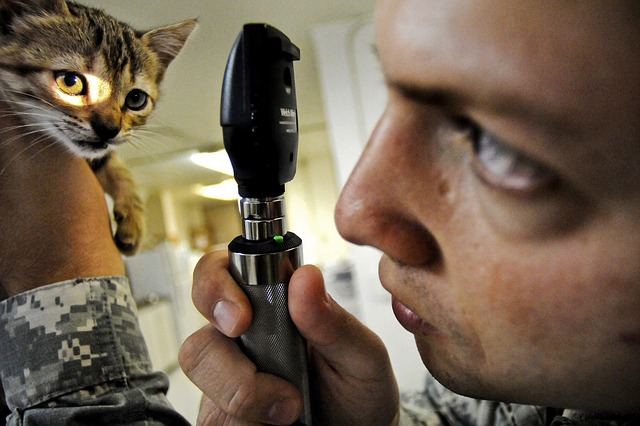
Good day. Somehow my niece calls and in a trembling childish voice asks for help.
She and her sister bathed her cat and wanted to clean her ears. And they never did this on their own. They were afraid to harm their darling.
I had to tell them in detail on the phone how to clean the cat’s ears at home. Together, we successfully completed this procedure. The girls were thrilled that they had succeeded. Now I will share with you the main rules for cleaning the ears of a cat.
The content of the article:
- 1 How to clean your cat’s ears: a step-by-step guide for the cat’s owner
- 2 We clean the ears of the cat at home
- 3 Useful Tips
- 4 How to clean your cat’s ears
- 4.1 The first rule is that it’s important to know the structure of the cat’s ears.
- 4.2 The second rule is to teach your pet how to clean your ears.
- 4.3 The third rule - we prepare cleaning tools
- 4.4 The fourth rule is how to clean?
- 4.5 Why clean your cat’s ears and how often
- 4.6 Frequent ear pests and diseases
- 5 How to brush your cat’s ears
How to clean your cat’s ears: a step-by-step guide for the cat’s owner
The cat is our faithful and devoted friend, it brings warmth and comfort to the house. But keeping the animal imposes certain responsibilities on its owner: the cat needs regular care, in case of illness it needs to be treated, properly fed. Then your pet will always delight you.
Regular care of a cat is not complicated, it will not take you much time. First of all, you need to pay great attention to the hair of the animal, it must be combed regularly. Your cat's teeth and gums require care, as well as her eyes and claws. Also, the cat needs to be bathed regularly, different breeds are bathed at different frequencies.
Cat ears require special care; they must be regularly cleaned and handled. Usually ears are cleaned immediately after bathing the pet. It is advisable to accustom a cat to all these procedures from an early age, because this animal is very nervous about the incomprehensible manipulations that are performed on it.
How often and why it is done
The cat does not need to clean its ears very often. They are especially thoroughly cleaned before the animal participates in exhibitions, removing earwax from there. If your cat does not take part in competitions, then from time to time you just need to remove dust and dirt from there.
Preventive cleaning consists in removing and processing the accessible part of the auricle; do not climb inside the ear canal. Usually, such preventive manipulations are carried out after combing the pet.
The frequency of ear cleaning depends on the breed of the animal, its age, state of health and other individual qualities. Different breeds have different activity of the ear glands, and the cat, which leads a more relaxed lifestyle, usually has less dirt in the ears.
Most often, the ears need to be cleaned by the sphinxes, they are very large and dirt accumulates in them very quickly.Owners of these animals have to perform this procedure almost daily.
Breeds that have small ears need to be cleaned once a week, or even a month. In this matter, everything is very individual and depends on the particular animal and its physiology. The owner must decide when to carry out this procedure. And, of course, cat ears must be cleaned before exhibitions.
How it's done?
Well, now we’ll directly tell you how to clean your cat’s ears at home. Few cats like this process. But if you have accustomed your pet to him since childhood, then usually he will patiently wait for the end of the manipulations.
If the animal is not accustomed to such procedures, then it will be necessary to clean her ears together: one holds, and the other brings gloss to the cat's ears. Some experts advise you to cut the cat’s claws before the procedure, or fix it with a towel, otherwise you may be injured.
In order for your animal to tolerate such manipulations more calmly, after each session, pamper it with your favorite treat.
Your pet will not like the fact that you climb into his ears and will scratch and tear from your hands. In order to facilitate the work and not damage the cat’s ears, in case she starts to resist, just wrap your pet in a towel
Take a cotton swab. First, wipe the cat’s ear with a dry swab, removing the main dust and dirt. It is better to use hydrogen peroxide or any other similar product when cleaning. You must make circular movements from the inside out. Change swabs as they become dirty.
For preventive purposes, such operations should be done at least once a month. However, it’s a completely different matter if your pet gets an ear mite. In this case, you and your cat will have a long and unpleasant treatment.
Ear mite
Ear mite is a fairly common feline disease, young animals are often sick. At the same time, pus accumulates in the auricle, and it becomes covered with a dark crust.
It’s very easy to understand that your animal is hurt - the cat furiously, bleeds his ears, is very restless and constantly shakes his head. In addition, sulfur is liberated abundantly in the ears. If the disease is started, then usually it is also exacerbated by a bacterial lesion of the auditory canal. Plus, the animal sometimes combs its ears and the skin around them until it bleeds.
This disease is quite easily treated, especially if it is in an early stage. You can diagnose this disease yourself, but it’s better to contact your veterinarian. He will accurately determine the disease and the degree of damage. To do this, you need to conduct a microscopic examination of the ear discharge of the animal. After that, you can do the treatment.
Anti-mite drugs are used to treat this ailment, along with antifungal and antibacterial agents.
Young cats and kittens are most susceptible to this disease, although a tick can appear in an animal of any age. Treatment usually lasts three to four weeks. After this, it is necessary to re-check in a veterinary clinic.
It can also be noted that individuals with weakened immunity are most often affected, so if your cat has an ear mite, then you need to change something in its content.
We clean the ears of the cat at home
In cats, as in humans, normally a substance is produced in the ears that lubricates the ear from the inside. Its remains go to the visible surface and give the impression of dirty ears. However, the presence of sulfur in the external auditory canal is normal, and you don’t need to go there again with cleaning, and even more than that, you can’t.
Such cleaning can itself lead to inflammation of the ear canal. Therefore, before trying to clean the ears of a cat, make sure that it is really necessary.
The need to clean the ears of a cat may arise after examining it.
Ear cleaning is necessary only if there is some pathological process in the ears, but this cleaning should strictly comply with the doctor’s recommendations, because the presence or absence of the pathological process can be determined only by the veterinarian after examining the animal and conducting additional tests.
The main reasons for the release of sulfur from the ears
A common cause of copious sulfur emissions in cats that are picked up from the street or have access there is an ear mite. At the same time, a huge amount of sulfur breasts is observed in the cat’s ear, the cat constantly shakes his head, his ears are noticeably disturbed.
Since this is a microscopic tick, it is impossible to detect it with the naked eye.
Diagnosis of an ear tick
Diagnosis of the presence of an ear tick is quite simple. The veterinarian takes a swab from the affected ear with a cotton swab and transfers the discharge to a glass slide. Further, by microscopy, he reveals or does not reveal there ticks or their eggs. Ear tick treatment is long-term but effective.
Otitis (internal, middle and external). Timely diagnostics and a correctly selected treatment regimen will help to relieve your cat of otitis without any problems.
Another cause of dirty ears and anxiety may be otitis media. Otitis is internal, middle ear and external. This is an inflammation of the ear, respectively, of the inner, middle and outer.
Malassesia is part of the normal microflora of the skin and the auditory meatus of animals, but with a weakening of the body's resistance, it can begin to grow actively and provoke inflammation. Bacteria are also present in a certain amount in the norm in the ear, and also cause otitis media in case of weakening of the body's defenses.
Bacteria and malassesia can also be seen in a smear from an ear under a microscope, but for this, the smear must also be stained. Usually damage to the ear canal with a fungus is accompanied by a specific smell.
Allergic cause. A cat swab may rule out an infectious cause of cat ear inflammation. In this case, it can be a banal allergic reaction.
If the swab from the ear is clear, a variant of the allergic cause of ear problems is possible. Allergies among cats are common. And often ears are also involved in the pathological process. They swell, blush, may itch. A copious amount of sulfur may not be there.
Allergies can be triggered by various environmental factors, among which nutrition plays an important role.Unfortunately, it is not possible to determine what the animal is allergic to, so you have to use the exclusion method, or immediately switch to a hypoallergenic feed.
Due to breed characteristics, some cats may more often have problems with their ears than others. The anatomical features of the structure of the auricle can provoke preheating, which causes increased growth of fungi and bacteria.
We clean correctly
Ear cleaning at different intervals is prescribed in most cases of ear problems.
Basically, this treatment should be carried out before applying therapeutic drops or ointments, since their use in a dirty ear will not give the desired effect. It is especially important to clean in the case of ticks.
Animal fixation
As already mentioned, there is no need to arm yourself with cotton buds and clean the cat’s ears “to shine”.
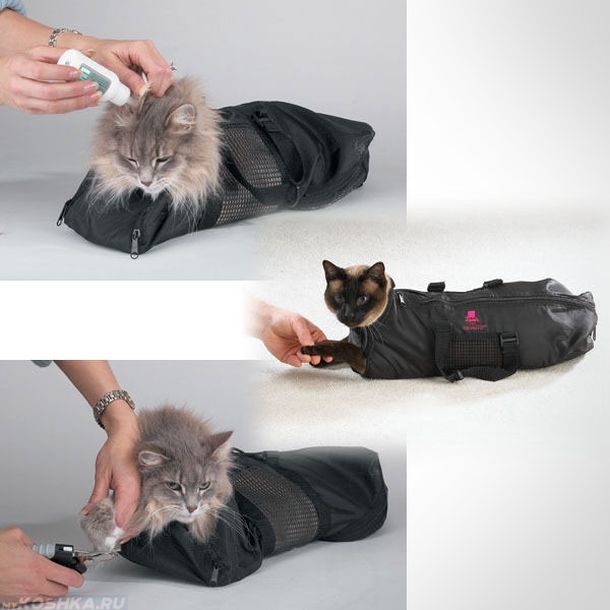
Begin with the fact that the cat or cat needs to be fixed. Fixation is protection against trauma to both the animal and the host. Any even the calmest animal can protest against such treatments. If the animal is very resistant, it might be best to go to a veterinary clinic for help.
How fixation helps the animal itself - an uncommitted animal can jerk sharply and cause injury to the epithelium of the auditory meatus. You should be especially careful with cotton buds - cotton wool can fly off the stick and remain in the ear canal. This is very bad, and needs the help of a specialist.
The use of saline
To do everything right and not harm, you need to pour a small amount of physiological solution (sodium chloride), about one milliliter into the ear, close the edges of the auricle and massage gently at the base.
Saline solution is an ideal tool for cleaning the ears of animals.
Next, release the ear and let the cat shake out all the excess from the eye. After cleaning, let the cat shake out excess from the ear.
You can also use special lotions to clean your ears, but there are no special benefits from this method. If gel is used, it needs a little, and pouring it directly into the ear is by no means necessary. It should be applied in a small amount on a cotton swab and walk it through the visible pockets of the auricle.
Can a cat clean ears with hydrogen peroxide? Hydrogen peroxide and alcohol-containing solutions can, on the contrary, harm your cat! Hydrogen peroxide is not needed for this, and sometimes it is not.
And also do not use alcohol-containing or soapy solutions to clean the ears. The use of peroxide or such solutions can lead to overdrying of the epithelium of the auditory meatus, and this, in turn, is fraught with cracks and sores, which in itself needs treatment.
We twist the auricle for convenience
The cat can resist eversion of the ear, but it does not hurt. Of course, if you do it carefully.
If you use any lotion or drops from a veterinary pharmacy to clean your ears, you should carefully study the instructions before using it. There are even special sticks that already contain a lotion for cleaning the ears.
Of course, for each ear you need to use different sticks, so as not to transfer the pathological flora from one ear to another.
Checking is important, not frequent ear cleaning
The owners of hairless cats should be especially attentive to the ears of pets, because they do not have mechanical protection - wool. The absence of the need to clean the ears of a cat does not exclude the need to check the condition of her ears.
It is worth doing from time to time so as not to miss any trouble. To do this, just look into both cat's ears. They should be pale pink, a small amount of sulfur is allowed.
If the cat’s ears somehow bother her — she tilts her head to one side, or shakes her head, scratches them, tries to get in there with her paw — you should go to the veterinarian even if you are not visually alert.
The ears of bald cats need especially careful monitoring and care, since there is no mechanical protection of the auditory meatus - wool. Also, some cats can have a very wide base of the ear, which can contribute to the entry of some unwanted provocateurs from the outside.
Useful Tips
Can I clean my cat’s ears? Is this done in certain cases, or is it worth cleaning regularly? Such questions often come to mind for people who are new to feline anatomy.
The ears of a cat are an almost perfect organ for perceiving sounds and adjusting balance. The vestibular apparatus located in them allows these animals to always land on four legs. Timely cleaning is the best way to avoid ear problems.
In addition, the animal may appear dizzy and various chronic diseases of the hearing organs. That is why, cleaning these critical organs is not only possible, but also necessary. In addition, you must regularly monitor the health of the ears of the cat.
Why does a cat have dirty ears?
A cat's ears can get dirty for various reasons. Before deciding how to clean them, it is necessary to determine the cause of the contamination.
If the animal has large ears, they will “collect” much more dust and dirt from the environment with which the pet usually interacts. But in cats with small ears, particles of dirt fall into the ears, which then settle on the inner surface of the ears.
When the amount of dirt and dust in the ears reaches a large amount, special glands are activated in the animal, which in large quantities produce earwax. Sulfur closes the dirt access to the middle ear of the cat. This reaction of the body is absolutely normal and does not require increased attention.
Sometimes there are times when the sulfur glands produce a large amount of protective sulfur all the time. This is most often found in cats whose coat is either extremely small or completely absent. This trend is observed due to the fact that the hairs, which, in essence, are the protection of the ears from dirt, are absent.
Since there is much more sulfur in the ears of cats of these breeds, animals need to pay more attention and regularly clean the ear passages. The breeds with minimal wool cover include the Don Sphynx, Peterbold and Elf. If the cat does not have hair, it emits more earwax
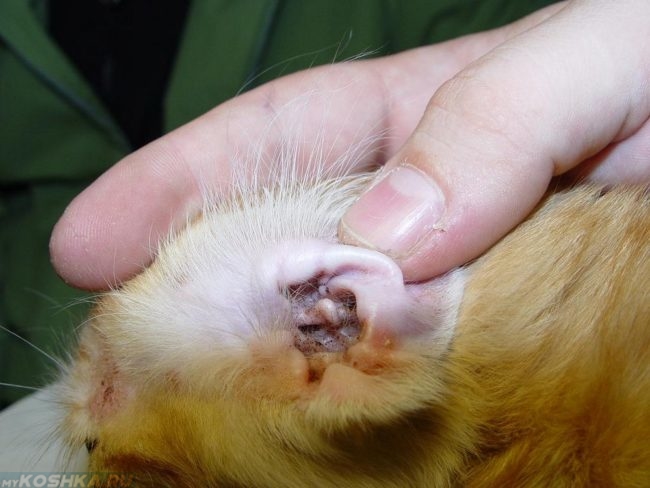
To correctly check the purity of cat ears, they need to be bent.Some are afraid to “turn inside out” the ears of their pets, but this does not cause the animal any discomfort. The inner wall of the ear should be completely clean.
The owner should pay attention to the following symptoms that may indicate a cat's disease:
- Dark deposits;
- Accumulation of dirt;
- Black spots;
- Brown tubercles;
- Combs.
Frequent examination helps to identify problems with the ears and solve them in a timely manner. For the convenience of checking your ears, you can buy a small flashlight that will help you look deep into the auricle.
How to clean cats ears at home
How often do you need to clean? It depends on the breed of the animal, its state of health, its age and temperament. The activity of the sulfur glands depends on the breed. Consequently, breeds that have small ears need ear testing and brushing once every two weeks. For example, fold cats can clean their ears once a month.
Cats who have been accustomed to ear cleaning and are much more comfortable with this procedure. Veterinarians advise to accustom a cat to ear cleaning from a young age, as this process is unpleasant. An accustomed animal suffers a procedure, and an unaccustomed animal constantly twitches and tries to escape.
To minimize the risk of injuries, it is best to clean the ears of an unprepared animal together, while one person will clean and the other will be kept. In addition, it is recommended that you first trim the pet's claws, or wear anti-scratches, and after the procedure, feed it a treat.
Before cleaning, the cat needs to be fixed with a towel, and pre-trimmed claws. For proper care of the cat, you need to prepare in advance the equipment for cleaning the ears.
Usually, it consists of the following things:
- Cotton buds. They will need one or two on each side if they are clean, or three or four if the ears of the animal are contaminated. Veterinarians prohibit the use of homemade cotton buds for cleaning, such as sticks or matches with wound cotton wool, which can easily scratch the inside of the auricle. It is best to use baby cotton buds with a limiter.
- Gel for cleaning the ears. Many breeders use improvised cleaning products, such as vegetable oil and water. But it is much better to buy a special tool - gel for cleaning cat ears. You can also use sterile saline. In no case can you use liquids containing alcohol to clean, clean with hydrogen peroxide and ordinary soap, as this will lead to drying of the skin, sores, increased production of sulfur and itching.
- Towel. They need to fix the cat, which can jerk or shake its head at an unsuccessful moment. Often, sudden movements during ear cleaning can result in personal injury. Ears are very sensitive organs that require careful handling.
Whether it is ordinary preventive or therapeutic cleaning, all actions should be performed very carefully and slowly, because the ears of the cat are very sensitive. To begin with, you need to maximize the ear, bending it to the limit. This will facilitate access to the entire surface of the organ and thereby speed up the cleaning process.
Some owners are afraid to reach the eardrum and pierce it. But anatomically this is not possible due to its location.
It is necessary to perform cleaning with outward movements, not inside the ear, in order to clean, not push, the dirt.
Otitis and ear mite in a cat
Otitis media is a very common disease in cats; its symptoms are often confused with regular ear contamination. Contrary to popular belief, this ailment is very dangerous and can lead to hearing loss, meningitis and death of the animal.In fact, this is a bacterial inflammatory process in the auditory canal of the animal.
There are such types of otitis media:
- Otitis externa;
- Otitis media of the middle ear;
- Otitis media of the inner ear.
Chronic otitis media manifests itself in periodic pain in the animal, which makes it nervous and aggressive during exacerbations. Otitis may be progressive, requiring surgical intervention.
There are several causes of otitis media:
- Injuries
- Fungus;
- Allergy;
- Parasites;
- Infections
Most often, otitis media of the external auditory meatus occurs due to the presence of otodectosis or an ear mite in the cat. This is a very common feline disease. The result of an ear tick is a characteristic “mud” mixed with sulfur. Usually, an ear mite appears in young cats.
At the same time, purulent masses accumulate in the ears of a sick animal, it becomes covered with a dark crust. Since the ears are covered with dark spots from mites, otodectosis can be determined visually with regular checks of the auricles.
Signs of the disease appear quite clearly. During otodectosis, the cat constantly and forcefully combes his ears, worries and shakes his head. Sulfur exudes abundantly in the ears. Due to itching and discomfort, the cat combes the ears themselves and the skin near them to bloody scratches.
If the disease is not treated, other bacteria develop in the ear canal, exacerbating the disease. Before treatment, the cat must be shown to the veterinarian. Otodectosis is treated quite easily, especially if the disease was detected in a timely manner.
Although this disease is simply diagnosed, it’s better to consult a veterinarian who will give comprehensive information about the disease itself, its stage and degree of damage.
As a treatment, the veterinarian usually prescribes anti-mite (e.g. Front Line), antifungal and antibacterial drugs. For example, cat ears are washed with various antiseptics, including chlorhexidine.
Before using these drugs at home, you should thoroughly clean all the dirt and sulfur from the ears of the animal so that the drug can effectively act on the inner wall of the auricles.
Usually, the treatment lasts no more than a month, after which the cat should be re-examined by a veterinarian.
How to clean your cat’s ears
Pet care includes many nuances. It is important to monitor not only the nutrition of the animal, but also the purity of its coat and body. Some procedures, such as cutting or removing tartar can be performed in special salons. And such a process as regular ear cleaning is carried out at home.
The first rule is that it’s important to know the structure of the cat’s ears.
The ears of feline animals are the perfect apparatus. They perceive three times more sounds than a person. And thanks to the vestibular apparatus that is in them, cats always land on four legs. Ears are a sensitive mechanism that requires care.
Many breeds have formed their external distinctive characteristics. In some representatives, the ears are thin and high, in others hanging, they are also short and arched, but for the most part the auricle has a similar structure in all. The more complex the changes, the more careful attention and care will be required.
The structure of the ear is similar to a similar human apparatus, and it consists of the outer, middle and inner ear. Sound entering the sink is amplified and transmitted to the sound bones.With the accumulation of earwax, fat and dust in these organs, audibility worsens. Therefore, care for the cat’s ears is mandatory and should be carried out regularly.
The second rule is to teach your pet how to clean your ears.
Ear cleaning is an important process not only for aesthetics, but also for the health of the pet. Therefore, it is necessary to train from an early age. It is necessary to prepare the tool in advance. Before you start the procedure, you can play with the kitten so that it relaxes.
If the animal is not accustomed or does not lend itself to persuasion, it must be carefully wrapped in a towel, but not too tight. And gently brush your ears. After that, still give a tasty treat. In a pet, cleaning should be associated more with good than with inconvenience and negativity.
The third rule - we prepare cleaning tools
For the normal process, you need to purchase several things:
- Ear sticks with limiters. The most important thing is special ear buds with limiters, which will prevent you from getting deep and breaking or harming something. It is strictly forbidden to use home-made fleece wound on matches. In this case, you can easily scratch your ear or bring an infection, which will lead to big problems and prolonged treatment.
- Gel for cleaning the ears. It is also recommended to use a special gel to clean the ears. Many people use water or vegetable oil for the process, but the gel contains both disinfectant and caring elements, which will greatly simplify the whole process. It costs a lot and is sold in almost all zoo pharmacies and stores.
It is advisable not to use: hydrogen peroxide, soap solution and other similar means. This can lead to excessive drying of the auricle, as a result of which wounds and sores may appear. And this, in turn, stimulates the additional production of sulfur, which leads to opposite results, the ear does not become clean, but becomes more and more dirty.
The fourth rule is how to clean?
Having prepared all the tools and fixing your pet, you can start cleaning. At the same time, the process must be carried out carefully and leisurely, at the same time not to delay, so that the cat or cat does not begin to twitch much, trying to break free from the bonds.
Next, a clean, dampened stick gently removes dirt that is deeper. Do not be afraid to get into the ear of a pet, but you should not climb too deeply. For some pets, it is enough to wipe the inside of the ear with a damp gauze swab without resorting to using other tools.
Often, domestic cats have practically no dirty sediment on the body, and such a cleaning will not bring her much discomfort and is carried out in almost a couple of minutes. If cleaning is carried out with the aim of treating a tick or otitis media, the process is carried out using special medicines.
Ear sticks in this case will need much more, since you need to remove all the dirt in order to instill the drug. At the same time, the pet will experience greater discomfort and begin to break out, so it must be kept well and cleaned promptly and carefully.
Even with regular cleanings and the correct conduct of all procedures, complications can arise that the doctor can solve quickly. You can’t climb on your own and check the reasons if they are not immediately visible.
Why clean your cat’s ears and how often
In the process of life, as in humans, in animals, fat, excess moisture and various substances are released through the pores of the skin. The same processes occur in the ears. And due to the fact that the pet often runs and plays, climbs bedside tables and other household items on cabinets, dust often flies into open ears and dirt accumulates in them.
So that small particles do not penetrate deeply, the body begins to produce a large amount of sulfur. It prevents dirt from entering the middle ear. The cleaning process in this case is carried out easily and as needed.
In sphinxes and other similar breeds with a small amount of hair, sebaceous glands work more intensively.
This is due to the fact that the hairs of ordinary cats and cats protect the auricle from the pain of part of the dust, dirt and small particles. In the case of "naked" pets, sulfur must completely protect the shell, so it produces more than normal breeds.
In this case, the cleaning process is carried out frequently and regularly. Continuous care is not only a good appearance of the pet, but also maintaining the normal functioning of the body and controlling the appearance of the disease.
Thus, it can be noted that if the cleaning does not bring the proper result, the dirt appears more and more or pus is visible on the sticks, which means the animal is infected, either with a tick or with otitis media. In this case, contact your veterinarian. After the examination, medications will be prescribed, and the treatment will pass quickly due to the fact that the disease was detected in the early stages.
Frequent ear pests and diseases
One of the main pests that can appear in a pet, especially one that often walks on the street, in the yard or communicates with other cats, is an ear tick. It can be seen by a large amount of brown crust, which accumulates on the inside of the ear. This pest feeds on the skin of the animal, and the pet often begins to itch.
If the pet is weakened or has recently been ill and often gets into a draft, then otitis media can occur. This is a more complex disease in which the treatment process takes a longer time and sometimes it is necessary to resort to intensive treatment if the process is severely started.
How to brush your cat’s ears
Caring for a pet is necessary daily. The owner of the cat must monitor the condition of the fur of the four-legged friend, clean his eyes and, if necessary, his ears. These measures must be carried out in order to prevent various diseases in cats.
After all, neglect, especially to clean ears, can provoke a number of dangerous ailments.
How to prepare a cat for ear cleaning?
Ear cleaning is not even a pleasant experience for a person. Therefore, the caudate should also be prepared for it.
If the inspection of a small kitten or adult cat is associated with such pleasant moments, then it will not resist and scratch you. Next, gently and gently fix the cat's head with a towel, but do not touch the paws, otherwise you will get very angry and lose the trust of the animal.
It is necessary to check the cleanliness of the cat’s ears by bending them, as if turning inside out. Such a step will not cause the animal pain or discomfort, so act confidently. The ear inside should be absolutely clean, without dirt and dark deposits. If you notice black spots and brown tubercles, it means that your cat is sick.
Otitis media and ear mite are the most common diseases of the ears in caudate. Both diseases are extremely dangerous for the health of the pet and at a late stage of development can serve not only as the cause of deafness, but also more serious health problems.
Every day the cat’s ears do not need to be cleaned, two or three times a week will be enough. If the ears inside are clean, the cleaning process will take several minutes. By removing ear wax and dust from your ears, you protect your four-legged friend from all sorts of diseases caused by cork from sulfur.
But there are breeds of cats, for example, sphinxes, which require frequent cleansing of the ears. When you get a thoroughbred animal, first ask the breeder for the rules for caring for him. To clean the delicate skin of the cat’s ears, special items are necessary: cotton buds, in no case homemade, like matches with wound cotton wool, which can damage and scratch the ear.
Also buy ear cleansing gel. Do not use plain water or vegetable oil for such purposes. After all, the price of the gel is acceptable. The final care item is a towel. You will fix the pet’s head to him, so that he does not shake his head at the time of cleaning the ear and does not damage it.
We clean correctly
Follow all the steps carefully and slowly. After all, you work with a very delicate and sensitive area of the body. Two approaches are possible here.
In the first case, cleaning looks like a preventive measure. In the second - as a medical cleaning. Both processes differ little from each other. The procedure is as follows:
- Bend the cat’s ear, turning it as far as possible.
- Do not squeeze the gel directly into the ear, dip a cotton swab into the composition and wipe the ear one centimeter deep. Do not be afraid to damage the eardrum, it is far away. But be careful.
- Try to make movements with a cotton swab not inside but outside, so as not to push the dirt deep into the ear.
- If your pet has otitis media, an ear mite or other diseases, try to strictly comply with the instructions of a veterinarian. Do not self-medicate! After all, with an ear tick you will not only clean the ears of the cat, but also bury the medicine.
- Try, contrary to the meow of the cat, thoroughly brush his ears. The quality of treatment for an ear tick depends on this.
- Change cotton buds as they become dirty.
Remember that the health status of a cat is determined by the state of its eyes, coat and ears. Take care of animals!
leave a comment